JavaScript Webpage Workout - JS Toolbox
August 15, 2020
This post follows Lessons 1 to 4. Please do those first for this reference guide to make more sense. Start from Lesson 1 if this is your first time to the course.
We’ve learned a lot so far and we’ll learn mountains more from this point onward. It’s impossible to remember it all even though this course was designed to be a workout that stresses repetition. But still, the details, while in your brain somewhere, may not be accessible when you need them most! So, let’s start a reference guide or a Toolbox that you can use whenever you need quick reminders.
This toolbox will hold only the coding tools you’ve used before. Don’t fill it with tools you haven’t used yet or else it will become impossible for you to find what you’re looking for.
As an example, you learned what textContent is and you’ve used it in a few exercises. You understand what it is and how to use it. So add textContent to the Toolbox. Maybe you read about createElement on MDN or W3schools but you haven’t used it yet. Don’t add it to your toolbox…yet.
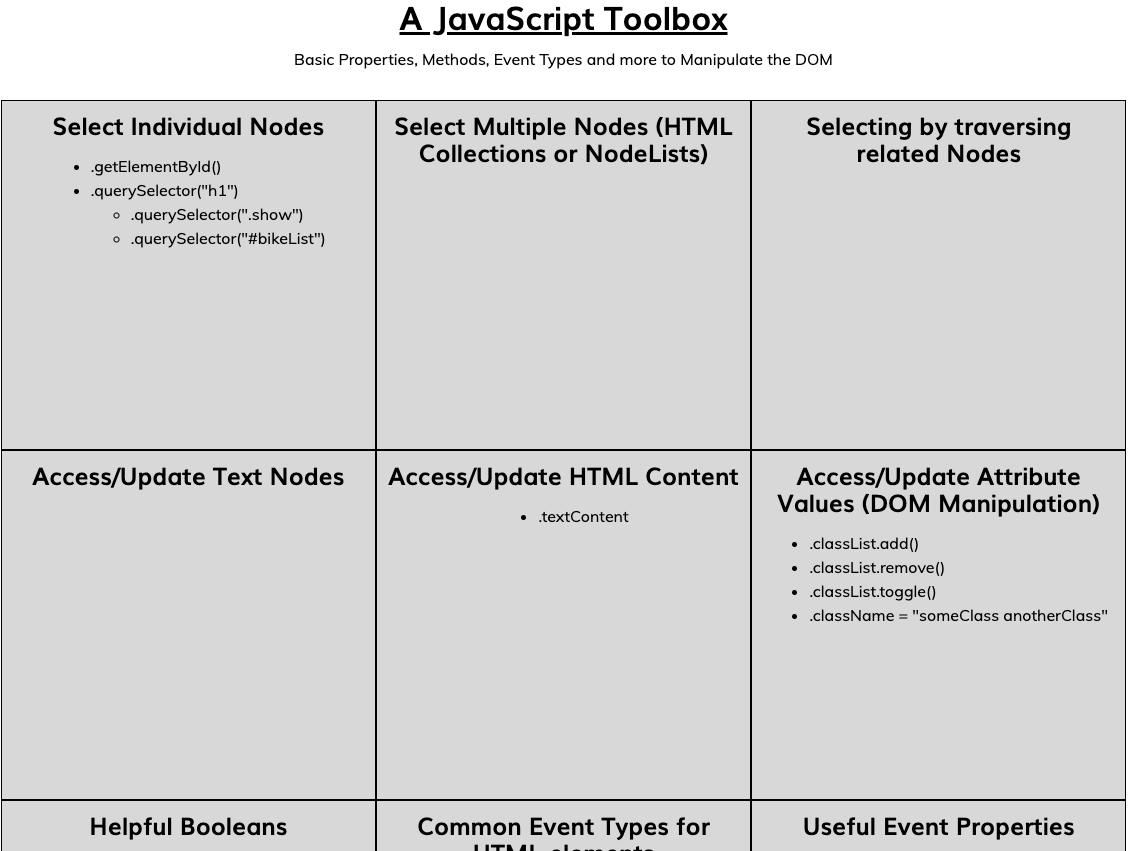
I’ve started a very basic Toolbox here that you can fork and add to it as the course goes on. You can see that I’ve started it for you by listing the various methods, properties, and event types we’ve worked with so far. Some of the boxes are still empty. By the end of this course, all of these boxes will be filled with tools you’ve used before.
Many times, you will find you can’t remember the name of a method or property but you can remember that you were able to perform such functionality or alter such properties. “I remember there was a way I could check if an element has a class but I’m not sure if the method is called ‘includes’ or ‘hasClass’ or ‘contains’ or…” You then go to the Toolbox. You remember that this method returns a Boolean value of true or false so you take a look at the box with the heading “Helpful Booleans” and you see .classList.contains(“some-class-name”). This is how the Toolbox will come to serve you.
The rules are simple:
- you learn something new about JavaScript and DOM manipulation,
- you actually use it in your code
- you try to understand how it works, at least, on a basic level
- Add it to the Toolbox!
- Don’t add anything you haven’t used yet!
- Add or adjust the boxes so they make sense to you. Style it however you want. It’s your JavaScript Toolbox.
The Basic Organization
-
Select Individual Nodes/Elements
- (This is what we’ve focused on with Lessons 1 to 4 in module 1)
-
Select Multiple Nodes/Elements (HTML Collections or NodeLists)
- (We’re going to move on to selecting multiple elements on a webpage in module 2)
-
Selecting by traversing related Nodes
- (Upcoming lessons)
-
Access/Update Text Nodes
- (Upcoming lessons)
-
Access/Update HTML Content
- (
textContentwas the first property we used in this box.createElement,innerHTML,removeChildand many more will show up in the upcoming lessons.)
- (
-
Access/Update Attribute Values (DOM Manipulation)
- (You’ve already learned
.add(),.remove(),.toggleandclassNamewith more to come.)
- (You’ve already learned
-
Helpful Booleans
- (You’ve already learned one Boolean-returning method
classList.contains)
- (You’ve already learned one Boolean-returning method
-
Event Target (Listeners)
- (You learned
addEventListener.)
- (You learned
-
Common Event Types for HTML elements
- (Remember we used a bunch of
addEventListenermethods with ‘click’ events on buttons. Well, that just scratches the surface ofmouse events. We’ll also learn aboutform events,keyboard events,document and window events, and more.)
- (Remember we used a bunch of
-
Useful Event Properties
- (Upcoming lessons will talk about
event.target,event.codeand more.)
- (Upcoming lessons will talk about
Coming soon: Module 2, warm-up where we’ll start accessing multiple elements on the DOM and learning how to manipulate them with loops and by index position.