JavaScript Webpage Workout - M1 Lesson 4 exercise 1
August 02, 2020
This lesson follows Lesson 4 warm-up. Please do that lesson first for this exercise to make more sense or start from Lesson 1 if this is your first time to the course.
📺 This Lesson 4 Exercise 1 is also available as a video.
You just learned that the effects of using style.display and classList.add('hide') or classList.remove('hide') produced the same results though with the advantage that classList can helps our JS code be more concise and more powerful by offering other methods and properties for manipulating the DOM. See MDN for all its features.
In the Lesson 4 warm-up we used two buttons to hide then show some text on the webpage. We will now try and reduce the two buttons down to one button to accomplish the same result and even change the text content on the button when the text is showing versus when it’s hiding.
Let’s add the console.log back in the function hideText() to check out what classList offers us.
function hideText() {
  console.log(heading.classList);
  heading.classList.add('hide');
}
hideText(); //Call the function then check out your console.
If we look in the console, we see the object called a DOMTokenList.
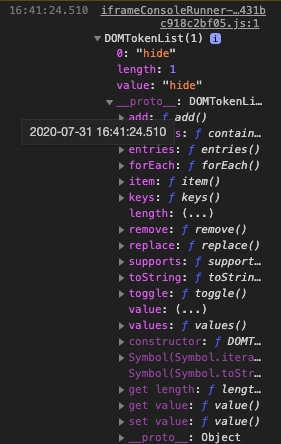
If we click on the triangle to the left (and __proto__ in Chrome Dev Tools), we’re exposed to a number of properties and methods. You see the .add() and .remove() methods we just used. Look a little closer and you see another method called .toggle().
Let’s refactor our code using .toggle() which will combine the effects of hiding and showing our text.
Give it a try on your own then compare your work with mine. Here’s a summary of what you need to do:
- Create a button element with text content of “Toggle” with an
idof toggle. - Access it and store it in a variable btnToggle.
- Create a new event handler function called toggleText and use the
.toggle()method so this new button both hides and shows theh3text “Available”.
Here’s what I did.
Create
First create a button element with text content of “Toggle” with an id of toggle.
<button class="btn" id="toggle">Toggle</button>Access
Then access it with querySelector() and store it in a variable.
const btnToggle = document.querySelector('#toggle');Manipulate
Now to MANIPULATE the DOM, let’s make a new function called ‘toggleText’ and incorporate the .toggle() method. As the argument we want to use the hide class we created in our CSS.
function toggleText() {
  heading.classList.toggle('hide');
}
Events and Listeners
Add an event listener for this new button, plus a ‘click’ value for the first argument and the toggleText event handler we just created for the second argument.
btnToggle.addEventListener('click', toggleText);Now, click the toggle button to hide the text then click it again to show the text. Now one button is doing two chores, all because of classList.
Exercise Extension
- Make the text content on the ‘toggle’ button change from ‘Hide’ to ‘Show’ when the text is not showing and ‘Show’ to ‘Hide’ when the text is showing.
You can still do this with just the one ‘toggleText’ function but there needs to be some conditional logic in the function to allow the text content to change from ‘Hide’ to ‘Show’. Check out classList in the console again and see what other method we could use to help with this logic.
Extra:
- If you solved it, try refactoring your statements using a ternary operator to produce the same results.
- Try changing the
h3text from “Available” to “Away” with the button’s text content set only to “Status”. So you’ll be changing the text of the heading and not the button.
Summary
You’ve now been exposed to the classList method’s add, remove, toggle, and contains. You can now see its possible to create CSS classes that do very specific actions or that perform a number of actions all-in-one class. When adding or removing or toggling these classes with JavaScript your webpage can be more user-friendly and also appear more dynamic.
Now it’s your turn using some icons! Keep practicing and go on to Lesson 4 exercise 2.