JavaScript Webpage Workout - M1 Lesson 4 Warm-up
August 01, 2020
This lesson follows Lesson 3. Please do that lesson first for this exercise to make more sense or start from Lesson 1 if this is your first time to the course.
📺 This Lesson 4 warm-up is also available as a video.
You learned that .getElementById() and .querySelector() are used to ACCESS a single element on a webpage (a.k.a. the DOM). We also learned that we can MANIPULATE the DOM with the style property and the many properties we’re already familiar with in CSS.
In this lesson, we’ll look at a more concise way to change an element’s styling by adding and removing classes with JavaScript.
Let’s start off by making a “Status Message” that we can toggle from one state to the other (i.e. Hide to Show to Hide).
Create
- Create a
divelement - Within the
div, create anh3as a child element - Give the
h3some text content of “Available”
<div>
  <h3>Available</h3>
</div>
Access
Next, access this element using the method .querySelector() and store it in a variable heading.
const heading = document.querySelector('h3');To see what what we’ve accessed, let’s console.log it.
console.log(heading);
// returns "<h3>Available</h3>"
You should see the h3 element and its text content.
Create
Let’s now create two buttons: one for hiding the text and one for showing the text.
- Create a
buttonelement with the text content “Hide” - Give it a
classof btn. - Give it an
idof hide. - Create a
buttonelement with the text content “Show” - Give it a
classof btn. - Give it an
idof show.
<button class="btn" id="hide">Hide</button>
<button class="btn" id="show">Show</button>
Let’s also add some CSS for these buttons.
.btn {
  margin: 20px;
  width: 120px;
  height: 2.5rem;
  padding: 5px;
  background-color: lightgreen;
  font-size: 1.3rem;
  outline: none;
  box-shadow: 0 0 3px darkgray;
}
.btn:hover {
  background-color: darkgreen;
  color: white;
}
.btn:active {
  box-shadow: inset 0 0 3px darkblue;
}
Access
Now let’s access these buttons with querySelector() and console.log the results.
const btnHide = document.querySelector('#hide');console.log(btnHide);
// returns "<button class="btn" id="hide">Hide</button>"const btnShow = document.querySelector('#show');console.log(btnShow);
// returns "<button class="btn" id="show">Show</button>"Everything looks like it’s working. Let’s use the buttons to hide and show the h3 element.
Just as we did with the previous lessons, we’ll do the same sequence for this lesson: C-A-M-E-L. We’ve CREATED and ACCESSED so now let’s MANIPULATE the h3 element.
MANIPULATE
We want to hide the h3 element. We can do the same as we did in the last lesson by using the style property but this time we’ll use the display property and set it to none.
heading.style.display = "none";The h3 should disappear from the DOM.
Now let’s take this expression and put it into a function that we’ll later use as an event handler function.
function hideText() {
  heading.style.display = 'none';
}
Let’s call the function to make sure it works.
hideText();The h3 disappears.
If we take the expression inside the function’s code block heading.style.display = 'none';
and tried to produce the same effect but using only CSS, it would look like this:
  h3 {
    display: none;
  }
But instead of isolating this to just the h3, let’s make it a generic CSS rule that hides anything we attach it to. We do that by making it a class and we’ll call it hide. So remove the h3 and change it to this:
  .hide {
    display: none;
  }
Whatever element we add this class to in the HTML, that element will disappear from the DOM. Let’s try adding it to the h3 in the HTML area just as a test.
<div>
  <h3 class="hide">Available</h3>
</div>
The h3 disappears. But we want to add this class using JavaScript. So remove class="hide" from the h3 HTML tag and let’s go back to our function again.
function hideText() {
  heading.style.display = 'none';
}
Let’s change the expression inside the code block to use a special property call classList. Let’s console log classList so we can see what it offers us under-the-hood. Make sure to call the function, too.
function hideText() {
  console.log(heading.classList);
}
// Call the function
hideText();
The console shows this:
// In CodePen console
[object DOMTokenList] {}

// In Chrome Dev Tools console
DOMTokenList(1)
Click on the triangle to the left of DOMTokenList (in Chrome Dev Tools also click on __proto__), it will show all the properties classList offers us.
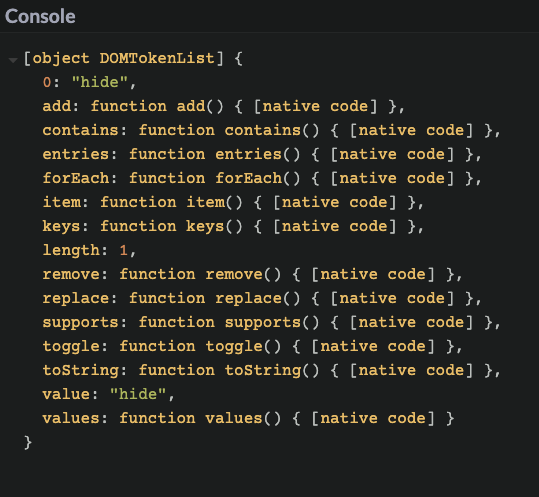
We’re going to use the properties add and remove for this example. (Side note: they are functions but because they are within an object—look for the curly brackets { } surrounding all the key-value pairs—what we call a function is called a method. A method is a function that is created within an object.)
So inside our function hideText() let’s include the method add(). We only need to write the class we want to add as the argument for the add() method. In our case, we made a class in the CSS area called hide so let’s include it as the argument.
function hideText() {
  heading.classList.add('hide');
}
Now if you call the function hideText(), the h3 will disappear like before but this time because we used classList and its add() method.
Events and Listeners
Remember we also made two buttons in the HTML area, so now target the hide button by adding the event listener method it. Then indicate as arguments that when this button is clicked, call the hideText function.
btnHide.addEventListener('click', hideText);Click the Hide button and the h3 should disappear.
Do the exact same sequence for the ‘Show’ button. You can try it yourself then compare it with my notes below.
- Make an event handler function called showText
- We used the
add()method to add theclasshide for the hideText function. So what other method can you use to remove that class in the showtext function? - Add an event listener to the button show
Here’s what I did.
I used classList along with its method remove() to remove the hide class we made in the CSS.
function showText() {
  heading.classList.remove('hide');
}
Now I’ll add the event listener method to the show button then add a click event and showText as the arguments.
btnShow.addEventListener('click', showText);When I click the Hide button the h3 disappears because the class hide is added to the h3 element.
When I click the Show button the h3 reappears because the class hide is removed from the h3 element.
If you reset your webpage so the h3 is showing again, open the Chrome Dev Tools console. Select the h3 tag, then click the ‘Hide’ button. You should see the class hide get added in real time to the h3 element. Click the ‘Show’ button and watch it in real time remove that class from the h3 element.
Summary
This essentially means, we can make some very creative classes in CSS that do all kinds of things: turn the font color purple and change the font size larger and add a rotation to the text and add a box-shadow and add a transition property to ease-in-out of the effect, etc. and do that in a single class we create in the CSS. This will be a very powerful tool we can use which just amounts to one line of code in our JS functions. That will make the code very clean and easy to read and we can Manipulate the heck out of that DOM however we want!
Now it’s your turn! Keep practicing! Go on to Lesson 4 exercise 1.