JavaScript Webpage Workout - M2 Lesson 1 (HTMLCollection)
August 20, 2020
This module follows Module 1. Please do that module first for Module 2 to make more sense. If this is your first time to the course, check out the Introduction.
📺 This M2 Lesson 1 will be available as a video soon.
What if we had a list of movies from various decades and we wanted to style these movies differently based on which ones we’ve seen and haven’t seen, which ones are from the 70s or classics from the 40s. Maybe we want to create a filter to look at only the movies starring Meryl Streep.
If we used what we learned before, querySelector or getElementByID, we could only access one element at a time. Luckily, the DOM API gives us a useful method to Access multiple HTML elements that are similar by their HTML tag name: getElementsByTagName.
Using CodePen or your own text editor, let’s copy/paste this HTML and CSS into our document.
<h1>WARM-UP</h1>
<h2>HTML Collections</h2>
<ul id="list">
  <li>Pulp Fiction (1994)</li>
  <li>Schindler's List (1993)</li>
  <li>Malcolm X (1992)</li>
  <li>The Karate Kid (1984)</li>
  <li>Coming to America (1988)</li>
  <li>Dead Poets Society (1989)</li>
  <li>Fast Times at Ridgemont High (1982)</li>
  <li>Monty Python's Life of Brian (1979)</li>
  <li>The Godfather (1972)</li>
  <li>Dog Day Afternoon (1975)</li>
</ul>
body {
width: 100vw;
display: flex;
flex-direction: column;
align-items: center;
}
#list {
width: 50vw;
height: auto;
background-color: black;
padding: 10px 20px;
}
li {
width: 100%;
color: white;
font-size: 1.3rem;
font-weight: 100;
text-align: center;
list-style: none;
line-height: 150%;
margin: 10px 0;
padding: 3px 0;
cursor: pointer;
background-color: black;
}We’ve CREATED our elements. Let’s now try to ACCESS all the li elements with getElementsByTagName() which takes as its argument, the HTML element as a string that we want to get. We’ll store it in a variable listItems.
const listItems = document.getElementsByTagName('li');To see what we get back, let’s console listItems. If you’re using CodePen you’ll need to open your browser’s console to see the results.
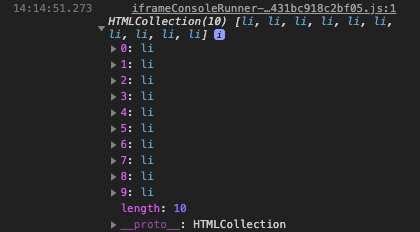
console.log(listItems)What comes back is called an HTMLCollection. The number 10 next to it indicates how many elements are in the collection. If you click the small triangle to look inside, you’ll see the li elements each with a number next to it indicating the index position. Index position? Sound familiar? JavaScript arrays also have index positions.
So just like JavaScript arrays, we can access these li tags using square brackets and a number, in this example, from 0 to 9. Let’s access the first li element and console log it.
console.log(listItems[0]);We see this:
<li>Pulp Fiction (1994)</li>Let’s access the 2nd element.
console.log(listItems[1]);<li>Schindler's List (1993)</li>Try to access the last element.
console.log(listItems[listItems.length-1]);<li>Dog Day Afternoon (1975)</li>A convenient tool that we can use with arrays is a loop. Let’s try to do the same thing with this HTMLCollection which is considered an “array-like object.” Write a for loop and console log each li element remembering to access each element by its index position.
for (let i = 0; i < listItems.length; i += 1) {
  console.log(listItems[i]);
}
Check the console to see that all the li elements are there.
So in the same way we MANIPULATED a single element in the previous lessons, we can MANIPULATE multiple elements inside this loop.
Use the style property to change each li text color to yellow.
for (let i = 0; i < listItems.length; i += 1) {
  listItems[i].style.color = "yellow";
}
You can see it’s just the same as in previous lesson except now we’re changing a group of similar elements by tucking that style.color assignment inside a loop. So all the li tags’ text are changed to yellow.
We can also use classList instead of style to change these li tags.
Make a CSS rule named “.bold” which will make all li text bold and black with a font-size of 1.5rem and background color of yellow.
.bold {
  font-weight: bold;
  color: black;
  background-color: yellow;
  font-size: 1.5rem;
}
Let’s add that class to each li tag’s classList just like we did in the previous lessons but now inside the loop. Make sure to use the same loop as before but just replace this expression listItems[i].style.color = "yellow"; with the classList and the add method.
for (let i = 0; i < listItems.length; i += 1) {
  listItems[i].classList.add('bold');
}
Our list changes dramatically by using that new class which has multiple CSS properties changing the li tags.
So, we can use style and classlist plus its methods inside a for loop to manipulate the DOM.
We can also use a for-of loop to do the same thing. In some cases in programming, we don’t need a ‘counter’ which is what the previous for loop gives us with the first and third statements in parenthesis (let i = 0; i < listItems.length; i += 1).
Here is the same result using a for-of loop.
for (let item of listItems) {
  item.classList.add('bold');
}
Try it yourself. In your CSS make a new class called “.done” that does the following:
.done {
  text-decoration: line-through;
  color: red;
  background-color: #ccc;
  font-weight: normal;
}
Use the for-of loop to add this class to each li tag.
for (let item of listItems) {
  item.classList.add('done');
}
The same dramatic changes happen by adding a class but this time using the for-of loop. So you’ve got both choices to loop through the HTMLCollection: for and for-of.
Your Turn
Use this warm-up as well as your knowledge from previous lessons to do the following.
- Change just the first
lielement’s text to yellow - Change just the last
lielement’s text to yellow - Change the even-numbered (i.e. by the index number)
lielements’ background color to the color #777 - Change the odd-numbered (i.e. by the index number)
lielements’ background color to yellow and the text color to black - Change all
litext content to “No movies” - Make a conditional statement that if a movie’s
litext content is greater than 20 characters, change the text to an empty string "". - If an
lielement’s text content is greater than 25 characters, add the CSS “done” class to it. If it’s less then 25 characters than add the CSS “bold” class to it. - If the text content for an
lielement has the word “The” in it, then add the ‘bold’ class to it. - Using a loop, number the
litags from 1 to 10. Place the numbers next to the text content for eachlielement and align the text to the left. - Using a loop, number the
litags from 10 to 1 but keep the same order with “Pulp Ficton” being at top of the list and “Dog Day Afternoon” being last in the list. Place the numbers next to the text content for eachliand align the text to the left.
Feel free to make separate loops for each task and just comment-out the ones you’re not working on so you can clearly see the results. Try to use the for loop for some of these tasks and for-of for the others.
You can compare your work with mine here at CodePen.
Here’s what I did.
- Change just the first
lielement’s text to yellow
listItems[0].style.color = "yellow";- Change just the last
lielement’s text to yellow
listItems[listItems.length-1].style.color = "yellow";- Change the even-numbered (i.e. by the index number)
lielements’ background color to the color #777
for (let i = 0; i < listItems.length; i += 1) {
  if (i % 2 === 0) {
    listItems[i].style.backgroundColor = "#777";
  }
}- Change the odd-numbered (i.e. by the index number)
lielements’ background color to yellow and the text color to black
for (let i = 0; i < listItems.length; i += 1) {
  if (i % 2 !== 0) {
    listItems[i].style.backgroundColor = "#777";
    listItems[i].style.color = "black";
  }
}

// OR
for (let i = 0; i < listItems.length; i += 2) {
  listItems[i].style.backgroundColor = "#777";
  listItems[i].style.color = "black";
}- Change all
litext content to “No movies”
for (let item of listItems) {
  item.textContent = "No movies";
}- Make a conditional statement that if a movie’s
litext content is greater than 20 characters, change the text to an empty string "".
for (let item of listItems) {
  if (item.textContent.length > 20) {
    item.textContent = ""
  }
}- If an
lielement’s text content is greater than 25 characters, add the CSS “done” class to it, otherwise, add the CSS “bold” class to theli.
for (let item of listItems) {
  if (item.textContent.length > 25) {
    item.classList.add('done')
  }
  item.classList.add('bold')
}- If the text content for an
lielement has the word “The” in it, then add the ‘bold’ class to it.
for (let i = 0; i < listItems.length; i += 1) {
  if (listItems[i].textContent.includes('The')) {
    listItems[i].classList.add('bold')
  }
}- Using a loop, number the
litags from 1 to 10. Place the numbers next to the text content for eachlielement and align the text to the left.
for (let i = 0; i < listItems.length; i += 1) {
  listItems[i].textContent = `${i+1}. ${listItems[i].textContent}`;
  listItems[i].style.textAlign = "left";
}- Using a loop, number the
litags from 10 to 1 but keep the same order with “Pulp Ficton” being at the top of the list and “Dog Day Afternoon” being last in the list. Place the numbers next to the text content for eachliand align the text to the left.
let counterdown = 10;
for (let i = 0; i <= listItems.length-1; i += 1) {
  listItems[i].textContent = `${counterdown}. ${listItems[i].textContent}`;
  listItems[i].style.textAlign = "left";
  counterdown -= 1;
}

// or
for (let i = 0; i < listItems.length; i += 1) {
  listItems[i].textContent = `${listItems.length - i}. ${listItems[i].textContent}`;
  listItems[i].style.textAlign = "left";
}
Keeping practicing by going on to Module 2 Lesson 2. We’ll look at getElementsByClassName which enables us to loop through an HTMLCollection where elements have the same class.