JavaScript Webpage Workout - M2 Lesson 2 (HTMLCollection)
August 22, 2020
This module follows Module 2 Lesson 1. Please do that lesson first for lesson 2 to make more sense. If this is your first time to the course, check out the Introduction.
📺 This M2 Lesson 1 will also be available as a video soon.
Let’s use the same list of movies from the last lesson. Let’s now try to Access those li tags using the class attribute and with the method getElementsByClassName.
First add a class attribute with the value “movie” to each li element. Additionally, give each li a second class that matches the decade the movie is from (e.g. 1994 add the class “decade90s”)
<h1>WARM-UP</h1>
<h2>HTML Collections</h2>
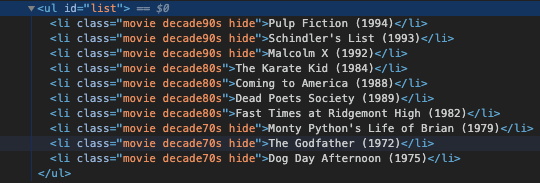
<ul id="list">
<li class="movie decade90s">Pulp Fiction (1994)</li>
<li class="movie decade90s">Schindler's List (1993)</li>
<li class="movie decade90s">Malcolm X (1992)</li>
<li class="movie decade80s">The Karate Kid (1984)</li>
<li class="movie decade80s">Coming to America (1988)</li>
<li class="movie decade80s">Dead Poets Society (1989)</li>
<li class="movie decade80s">Fast Times at Ridgemont High (1982)</li>
<li class="movie decade70s">Monty Python's Life of Brian (1979)</li>
<li class="movie decade70s">The Godfather (1972)</li>
<li class="movie decade70s">Dog Day Afternoon (1975)</li>
</ul>Let’s now try to ACCESS all the li elements with getElementsByClassName() which takes as its argument (of type String) the class we want to access. We’ll store it in a variable movies then console log it.
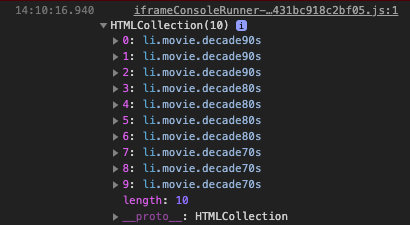
const movies = document.getElementsByClassName('movie');console.log(movies)Just like getElementsByTagName(), getElementsByClassName() gathers all the elements in an HTMLCollection. If you click the small triangle to look inside, you’ll see the li elements and the classes we added.
The tools to access these elements are the same whether we access them by their tag names or by their class names: 1) we can access by index [0] or [1], etc. and 2) we can use loops to manipulate these elements.
console.log(movies[0]);

// returns this
<li class='movies decade90s'>Pulp Fiction (1994)</li>
// Use a `for` loop to loop through the HTMLCollection
for (let i = 0; i < movies.length; i += 1) {
console.log(movies[i]);
}
// Using a 'for-of' loop
for (let movie of movies) {
console.log(movie);
}Check the console to see that all the li elements show up just like in the last lesson where we used getElementsByTagName.
So what’s the advantage to using getElementsByClassName?
Getting elements by class name allows us the advantage of filtering. For example, loop through the HTMLCollection but hide (on the webpage) all movies that are not from the 70s.
for (let movie of movies) {
  if (movie.classList.contains('decade70s') === false) {
    movie.style.display = "none"
  }
}

// or using the 'not' operator !
for (let movie of movies) {
  if (!movie.classList.contains('decade70s')) {
    movie.style.display = "none"
  }
}
Now filter only movies from the 80s and 90s.
for (let movie of movies) {
  if (movie.classList.contains('decade70s') === true) {
    movie.style.display = "none"
  }
}

// or like this
for (let movie of movies) {
  if (movie.classList.contains('decade70s')) {
    movie.style.display = "none"
  }
}
Now filter only movies from the 90s.
for (let movie of movies) {
  if (movie.classList.contains('decade90s') === false) {
    movie.style.display = "none"
  }
}

// or
for (let movie of movies) {
  if (!movie.classList.contains('decade90s')) {
    movie.style.display = "none"
  }
}
Now instead of usng the style property let’s try filtering 80s movies using classList. First make a CSS class called “hide” that sets the display property to none. Use that hide class with a classList method to hide all movies from the 70s and 90s.
  .hide {
    display: none;
  }
for (let movie of movies) {
if (!movie.classList.contains('decade80s')) {
movie.classList.add('hide');
}
}What shows are just the 80s movies. Check the console to see that the class ‘hide’ has been added to some of the elements. It should look like this:
Don’t refresh your webpage! If we wanted to now show the 70s and 90s, how would we do it? How can we do it without writing a chunky function with if statements and add and remove methods everywhere?
Well, a simple and clean solution is to write a function that loops through the HTMLCollection and resets all elements, i.e. removes the hide class from them. So write a function named “reset” that does that.
function reset() {
for (let movie of movies) {
movie.classList.remove('hide');
}
}If we now call the reset function just before we do the loop, we can change the .contains() argument from 70s to 80s to 90s in our loop and the webpage list displays correctly because the list of movies is always being “reset” before the loop happens. Try it with the 90s movies then the 80s movies.
// Removes the 'hide' class from any `li` tags
reset();
// Filters the movies showing only the 90s
for (let movie of movies) {
if (!movie.classList.contains('decade90s')) {
movie.classList.add('hide');
}
}// Removes the 'hide' class from any `li` tags
reset();
// Filters the movies showing only the 80s
for (let movie of movies) {
  if (!movie.classList.contains('decade80s')) {
    movie.classList.add('hide');
  }
}One thing you will notice is that the class name “decade70s”, “decade80s”, “decade90s” is the only part that changes inside of the .contains() method. It would be ideal if let we the user to select which decade they want to see the movies for.
So let’s create a <select> menu in our HTML that can help us choose which movies to show in the list. For example, if the menu selection is ’90s’ then our movie list only shows movies from the 90s.
We will use the same C-A-M-E-L sequence we used in the previous lessons of module 1.
BUT FIRST comment-out the loop we were using above so that it doesn’t keep executing.
// COMMENT OUT your loop

// for (let movie of movies) {
//   if (!movie.classList.contains('decade90s')) {
//     movie.classList.add('hide');
//   }
// }
In your HTML, right above the ul list CREATE a select menu with four option tags like this.
<select id="menu">
  <option value="" selected disabled>Select a decade</option>
  <option value="decade70s">70s</option>
  <option value="decade80s">80s</option>
  <option value="decade90s">90s</option>
</select>
Let’s ACCESS the select menu by id.
const menu = document.querySelector('#menu');We already made our loop and reset function so let’s add them to a new function called “selectMovies” which we will use to MANIPULATE our list. We will give this event handler function a parameter called decade. Then use a template literal in the contains() method for the value of decade (which will be “decade70s”, “decade80s”, “decade90s” according to what we set up in our menu above).
// Notice the parameter 'decade' is used 5 lines below in a template literal
function selectMovies(decade) {
  reset();

  for (let movie of movies) {
    if (!movie.classList.contains(`${decade}`)) {
      movie.classList.add('hide');
    }
  }
}
Finally, let’s address the EVENTS and LISTENERS.
The menu will listen for an event and then call a function.
In previous lessons, we used the ‘click’ event type with <button> elements but with the <select> element we will use an event type called ‘change.’ So when the menu changes its value, we will call a function.
In this example, start off by adding an addEventListener method to the menu. Add the ‘change’ argument then make an anonymous function that performs a console log of the menu’s value property. That equates to the same value attributes we set up in our HTML above, e.g. <option value="decade70s">70s</option>.
menu.addEventListener('change', () => {
  console.log(menu.value)
});
Now go ahead and use the menu to select ”70s” and what should come back in the console is decade70s. So the menu.value indicates the <option> value attribute BUT it also matches the second classes we added to the HTML <li> elements.
<!-- in the select menu -->
<option value="decade70s">70s</option>

<!-- in the list items -->
<li class="movie decade70s">Monty Python's Life of Brian (1979)</li>
  <li class="movie decade70s">The Godfather (1972)</li>
  <li class="movie decade70s">Dog Day Afternoon (1975)</li>
How is that useful?
Well, if you look at the function we made above called “selectMovies” it requires a parameter called “decade.” When we change the menu then call selectMovies, we will use menu.value as the argument, e.g. selectMovies(menu.value).
Let’s refactor our addEventListener() method so it uses selectMovies(menu.value) rather than console.log(menu.value)
menu.addEventListener('change', () => {
  selectMovies(menu.value)
});
Now use the menu to select any of the decades, the function selectMovies is called and filters the movies then the HTML list on the webpage updates.
Cool! Everything works except…how do we get back to seeing the whole list? That’s your challenge. Give it a shot then compare your code with mine below.
Here’s what I did.
I first added another <option> element to my <select> menu with the textContent of “All Decades” and for the value attribute I gave it the value “all-decades”.
<select id="menu">
  <option value="select a decade" disabled selected>Select a decade</option>
  <option value="all-decades">All Decades</option>
  <option value="decade70s">70s</option>
  <option value="decade80s">80s</option>
  <option value="decade90s">90s</option>
</select>
The other part I had to adjust was the event handler function.
The first question in my mind was “What if the selectMovies decade parameter is equal to “all-decades” (which is the value of that option element I just created), what should happen?” I should probably call the reset() function which removes all the ‘hide’ classes from those li elements then all the li elements will show on the webpage. Well, as you know our selectMovies function is already calling that function within its scope.
function selectMovies(decade) {
  reset(); // it's called here already

  for (let movie of movies) {
    if (!movie.classList.contains(`${decade}`)) {
      movie.classList.add('hide');
    }
  }
}
So I decided I only needed to add one more if statement that would break out of the function if the menu’s value is equal to “all-decades.” In other words, I’ll just add a return after the if statement to break out of the function and ignore the for-of loop altogether.
function selectMovies(decade) {
  reset(); // removes all the 'hide' classes from <li> tags

  if (decade === "all-decades") return; // 'return' stops the function here

  // Hide all movies that don't match the menu selection
  for (let movie of movies) {
    if (!movie.classList.contains(`${decade}`)) {
      movie.classList.add('hide');
    }
  }
}
Now when I try the menu, all the options work as I expect them to.
In Summary:
- we added more classes to our movie list
lielements - we accessed those
lielements usinggetElementsByClassName() - we used a loop to filter out elements using
classList.contains()andclassList.add('hide')using a CSS rule we made called “hide” - we made a function called reset to loop through the
litags and remove the “hide” class from anylitags that had it - we created a
selectmenu withoptionswith value attributes that match the classes in ourlitags - we accessed the
selectmenu usingquerySelector - we set up an
addEventListenerto listen for when the menu changed its value. - we created an event handler function that could handle all values in the
selectmenu, including the value to show “all-decades”
You can see this lesson’s code here at CodePen.
Your Turn
Exercise 1: Make a library of 10-20 books from at least 3 different genres. Build a list of those books’ titles and the genre they’re in. Add a menu to view just the books in a particular genre.
The goal is to use getElementsByClassName, and the HTMLCollection that it creates, to filter through the books only showing the genre you select. It is very similar to what we did above with movies by the decades. Start with a list of books and a select menu; set up the HTML with helpful class and value attributes then use JavaScript to access and manipulate those books (i.e. the HTML elements of each book). Try to do this on your own, only consulting the code above when absolutely necessary.