JavaScript Webpage Workout - M2 Lesson 3 (NodeList)
August 25, 2020
This module follows Module 2 Lesson 2. Please do that lesson first for lesson 3 to make more sense. If this is your first time to the course, check out the Introduction.
📺 This M2 Lesson 3 is also available as a video.
Let’s start this lesson by adding some inspiring quotes by famous people to our webpage.
First add a main tag with the class “slideshow-container” that will hold all the quotes.
<main class="slideshow-container">

</main>
Next, let’s add the HTML for a quote and the quote’s attribution line as well as a container to put them in which we’ll give the class name “quotes.” Let’s use a q element for the quote since browsers will automatically put quotation marks around the text.
<main class="slideshow-container">
<div class="quotes">
<q>I love you the more in that I believe you had liked me for my own sake and for nothing else.</q>
<p class="author">—John Keats</p>
</div>
</main>Go find two more quotes that you like and add them to the HTML.
<main class="slideshow-container">
<div class="quotes">
<q>I love you the more in that I believe you had liked me for my own sake and for nothing else</q>
<p class="author">—John Keats</p>
</div>
<div class="quotes">
<q>But man is not made for defeat. A man can be destroyed but not defeated.</q>
<p class="author">—Ernest Hemingway</p>
</div>
<div class="quotes">
<q>I have not failed. I've just found 10,000 ways that won't work.</q>
<p class="author">—Thomas A. Edison</p>
</div>
</main>Let’s add some CSS to style the webpage and quotes a little bit.
.slideshow-container {
  width: 100vw;
  height: calc(100% - 20px);
  align-items: center;
  position: relative;
  background: #f3f3d4;
}

q {
  font-size: 3.3vw;
  font-style: italic;
  text-align: left;
}

.author {
  font-size: 3vw;
  color: #8e4e4e;
  text-align: right;
}
Let’s now try to ACCESS all the quotes by using a new method querySelectorAll which allows us to select those HTML elements by their tag name, class or CSS selector. Let’s try it by tag name first. We’ll store them in the variable quotes then console log quotes.
const quotes = document.querySelectorAll('div');
console.log(movies)
What shows in the console is called a NodeList.
Open the browser’s dev tools and click the small triangle next to “NodeList(3)” to look inside. You’ll see the div elements and the class “quotes” that we added to each element.
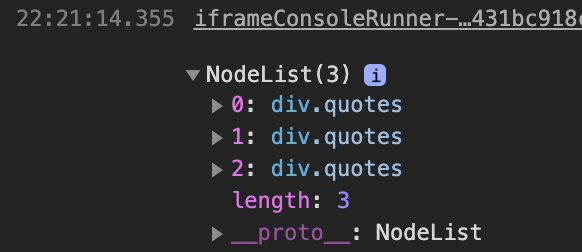
If this reminds you of the HTMLCollections, then you wouldn’t be wrong; there are a lot of similarities. NodeLists are also array-like in that each element has an index position.
Let’s now select those div elements by their class name. Just like with querySelector we have to add a ”.” to indicate a class just like when when writing a CSS rule for a class.
const quotes = document.querySelectorAll('.quotes'); // Don't forget to add the period
console.log(quotes)
The console comes back with the same NodeList of results.
Finally, let’s try selecting all the authors’ names by using CSS selector syntax. We’ll store this in a variable called authors.
const authors = document.querySelectorAll('div.quotes > p.author');
console.log(authors);
We could select this more concisely with “.author” or even “p” but this example shows you that you can select elements the same way you write a CSS rule. All the same CSS Selectors can be used to access groups of elements on the DOM.
We can, for example, select just the first and last quotes with CSS selectors like this.
const quotesFirstLast = document.querySelectorAll('div:first-child, div:last-child');
console.log(quotesFirstLast);
You can see in your console that the second quote is excluded.
So querySelectorAll gives us much more precision when selecting or ACCESSing elements!
Just like an HTMLColection, we can also use loops with a NodeList. A NodeList allows us to use a for, for-of and an iterator called forEach. Let’s try using each loop just to get some practice.
Use a for loop to console log all the quotes.
for (let i = 0; i < quotes.length; i += 1) {
  console.log(quotes[i]);
}
Now console log the authors using a for-of loops.
for (let author of authors) {
  console.log(author);
}
Lastly, let’s use the forEach method to console log the variable quotesFirstLast that we created above.
quotesFirstLast.forEach(quote => console.log(quote));Let’s now erase everything but the expression that accesses the quotes.
// Erase everything but this expression
const quotes = document.querySelectorAll('.quotes');
Continuing to make our quote rotator, create some more HTML elements.
Add an arrow that points to the right and one that points to the left. We’ll situate them on each side of the quote. Make sure to put them inside the main element. I’m using HTML symbols for my arrows but feel free to use icons or emojis just as we used in previous lessons.
<main>
<!-- The quotes HTML is here -->
<!-- The arrows are here -->
<button class="prev" id="prev">❮</button>
<button class="next" id="next">❯</button>
<!-- more stuff coming here -->Add some CSS to position them on the sides.
/* Next & previous buttons */
button.prev, button.next {
  cursor: pointer;
  position: absolute;
  top: 50%;
  margin-top: -30px;
  padding: 8px 12px 16px;
  background-color: hsla(60, 56%, 89%, 1);
  color: #888;
  font-size: 5vw;
  border: transparent;
  outline: none;
  transition: all .2s;
}

/* "next" button to the right */
button.next {
  position: absolute;
  right: 0;
}

button.prev:hover, button.next:hover {
  background-color: rgba(0,0,0,0.6);
  color: black;
}

button.prev:active, button.next:active {
  background-color: rgba(0,0,0,0.9);
  color: white;
}
Now let’s hide all of the quotes by adding a display property set to none in the CSS.
.quotes {
  display: none;
}
We will also make a CSS class to show one of the quotes called show-quote. Make sure to put show-quote underneath the class quotes in the CSS so it can override the quotes class when it gets added to a quote HTML element. Remember that classes lower in your CSS file can override classes above them or higher up in your CSS file.
.quotes {
  display: none;
}

.show-quote {
  display: flex;
  flex-direction: column;
  justify-content: center;
  padding: 0 6rem;
  height: 93vh;
}
To make sure the layout is okay, let’s add the show-quote class to the first HTML quote.
<main class="slideshow-container">
<div class="quotes show-quote">
<q>I love you the more in that I believe you had liked me for my own sake and for nothing else</q>
<p class="author">—John Keats</p>
</div>
<!-- ...rest of the HTML ending with main-->So the layout looks balanced with an arrow to the left, the quote in the middle and an arrow to the right.
Lastly, let’s add a footer with a “dot” indicator to indicate which quote we’re looking at in the whole set of quotes.
<!-- dot indicators -->
<footer class="dot-container">
  <span class="dot"></span>
  <span class="dot"></span>
  <span class="dot"></span>
</footer>

</main>
Let’s add some CSS.
footer.dot-container {
  text-align: center;
  padding: 20px;
  background: #8e6161;
}

/* The dots/bullets/indicators */
.dot {
  height: 15px;
  width: 15px;
  margin: 0 2px;
  background-color: #333;
  border-radius: 50%;
  display: inline-block;
  transition: background-color 0.6s ease;
}

.active {
  background-color: #f3f3d4;
  height: 17px;
  width: 17px;
}
So if the first quote is showing, then the first dot will have a different styling to it; that is what the active class is for in the CSS. Let’s add it to the first span tag in the HTML so we can get an idea of what that looks like.
<!-- dot indicators -->
<footer class="dot-container">
  <span class="dot active"></span>
  <span class="dot"></span>
  <span class="dot"></span>
</footer>
Then if we click the “forward” arrow to the right or we click the 2nd dot, then the quote will advance to the second quote. So we want both the arrows and the dots to control which quote we’re looking at when we click them.
Knowing that, let’s add another querySelectorAll for the dots and we’ll store it in the variable dots.
// From before
const quotes = document.querySelectorAll('.quotes');
// Add this one
const dots = document.querySelectorAll('.dot');
Now, also access the two arrows using querySelector.
const quotes = document.querySelectorAll('.quotes');
const dots = document.querySelectorAll('.dot');
// Add these
const prevArrow = document.querySelector('#prev');
const nextArrow = document.querySelector('#next');
So what is the logic behind this?
Let’s start with the arrows that change to the next and previous quote.
When we click the right arrow, it advances from the 1st div with the class quotes to the 2nd div with the class quotes in our HTML. So we need this ‘click’ event to control a number that goes from 1 to 2 to 3 then back to 1; that’s what the right arrow should do.
If you remember in some of the past lessons, we controlled the font-size as well as the brightness image effect by controlling a number getting bigger or smaller. We stored the font-size and the image brightness in a variable and set it to a Number type. In this quotes example, what will the number we store in a variable coincide with?
NodeLists, like HTMLCollections, have index positions and they also have a length property.
console.log(quotes[0]);
console.log(quotes.length);
The quote at index 0 is the first quote div and the one at index 1 is the second quote div.
console.log(quotes[0]);
console.log(quotes[1]);
So that is what our variable (that stores a Number type) will keep track of; that is what our right arrow will increment: 0 to 1 to 2 back to 0.
Let’s make that variable which we’ll call “currQuoteIndex” and assign it the Number value of 0.
let currQuoteIndex = 0;Let’s add an event listener to the right arrow which we assigned to the variable “nextArrow”, add a ‘click’ event type as the first argument then add an event handler function called “nextQuote” as the second argument. (We’ll build that function “nextQuote” coming up.)
nextArrow.addEventListener('click', nextQuote);The job of the “nextQuote” function is simply to increment the value of currQuoteIndex by one, but when the value gets to the last index position of the NodeList, currQuoteIndex needs to be assigned back to 0 again. Let’s also include a console log in the function so we can make sure we’re incrementing the Number value correctly then going back to 0 again (all by clicking only the next arrow icon).
const nextQuote = () => {
  if (currQuoteIndex === quotes.length-1) {
    currQuoteIndex = 0
  } else {
    currQuoteIndex += 1;
  }
  console.log(currQuoteIndex)
}

//or using a ternary statement
const nextQuote = () => {
  currQuoteIndex === quotes.length-1 ?
    currQuoteIndex = 0
    :
    currQuoteIndex += 1;
  console.log(currQuoteIndex)
}
Good. It works.
Now, let’s set up the leftside arrow icon to decrement the value currQuoteIndex by one but when the value gets to 0, we need to assign currQuoteIndex the NodeList’s length minus 1 (i.e. the last element in the NodeList). Let’s make another function called “prevQuote” which does just that. Remember to add a console log in the function so we can track the value.
const prevQuote = () => {
  if (currQuoteIndex === 0) {
    currQuoteIndex = quotes.length-1
  } else {
    currQuoteIndex -= 1;
  }
  console.log(currQuoteIndex)
}

//or using a ternary statement
const prevQuote = () => {
  currQuoteIndex === 0 ?
    currQuoteIndex = quotes.length-1
  :
    currQuoteIndex -= 1;
  console.log(currQuoteIndex)
}
Next, set up the event listener for the ‘previous arrow’ icon which is stored in the variable “prevArrow.” Then check out the console making sure the value is correct when clicking the previous arrow and the next arrow.
prevArrow.addEventListener('click', prevQuote);Now that currQuoteIndex is tracking the Number value correctly, we need to use that value to represent the index number for the div elements in the NodeList.
So we go from this…
console.log(quotes[0])…to this.
console.log(quotes[currQuoteIndex])The next thing we need to work on is a function whose job is to only show each quote. This keeps our code clean and easy to read since each function will only do one small task.
To actually show a quote, we have to add the CSS class we made called show-quote to the div element that holds the quote. Those elements are in the NodeList we created with querySelectorAll. Here’s that function.
const showQuote = () => {
  quotes[currQuoteIndex].classList.add('show-quote');
}

//or as one line of code
const showQuote = () => quotes[currQuoteIndex].classList.add('show-quote');
Now all we have to do it further compose our two event handler functions called “nextQuote” and “prevQuote” by adding this new “showQuote” function.
// As a ternary
const nextQuote = () => {
  currQuoteIndex === quotes.length-1 ?
    currQuoteIndex = 0
    :
    currQuoteIndex += 1;
  console.log(currQuoteIndex);
  showQuote();  // This is new
}

// Or as an if-else statement
const prevQuote = () => {
  if (currQuoteIndex === 0) {
    currQuoteIndex = quotes.length-1
  } else {
    currQuoteIndex -= 1;
  }
  console.log(currQuoteIndex);
  showQuote(); // This is new
}
Now click the next arrow and…Oh, no!!! What’s happening? The quotes are literally stacking on top of each other on the webpage.
Well, remember previously with getElementsByClassName when we created a special reset function that removed the show class we added to the HTML elements? We need to do the same here.
So create a new function called “reset” that removes the show-quote class from the elements in the NodeList.
/* Remember that we can use 'forEach', 'for', or
'for-of' loops with NodeLists */
const reset = () => {
  quotes.forEach(quote => {
    quote.classList.remove('show-quote')
  });
}

//or this way
const reset = () => {
  quotes.forEach(quote => quote.classList.remove('show-quote'));
}
Now add that ‘reset’ function to the two event-handler functions called “nextQuote” and “prevQuote.”
const nextQuote = () => {
  currQuoteIndex === quotes.length-1 ?
    currQuoteIndex = 0
    :
    currQuoteIndex += 1;
  console.log(currQuoteIndex);
  reset(); // This is new
  showQuote();
}

const prevQuote = () => {
  if (currQuoteIndex === 0) {
    currQuoteIndex = quotes.length-1
  } else {
    currQuoteIndex -= 1;
  }
  console.log(currQuoteIndex);
  reset(); // This is new
  showQuote();
}
Click the arrows and the webpage looks and works like its suppose to. The quotes aren’t piling up on each other because the “reset” function is removing the past quote by removing the class show-quote. Then the showQuote() function is called which populates the webpage with the next quote.
…
The only thing left is to get the dot indicators in the footer to work. The dot’s sole job is to indicate which quote in the group we are looking at. If we’re looking at the 3rd quote then the 3rd dot should reflect this by altering its styling by adding the CSS active class. If we then go to the 1st quote, the 3rd dot needs to remove the active class and the 1st dot needs to add the active class.
The dot HTML elements are already stored in a NodeList when we accessed them previously and we assigned them to the variable “dots.”
const dots = document.querySelectorAll('.dot');“quotes” is a NodeList and “dots” is a NodeList. That means we can use the same global variable we set up before called currQuoteIndex. Afterall, the dots follow the quotes; if the 2nd quote is showing then the 2nd dot should change its style.
In the spirit of clean and easy-to-read code, let’s make a function named “hiLiteDot” that only highlights each dot by adding the ‘active’ class.
const hiLiteDot = () => dots[currQuoteIndex].classList.add('active');Then further compose the two event handler functions called “nextQuote” and “prevQuote” by adding the “hiLiteDot” function to it.
const nextQuote = () => {
  currQuoteIndex === quotes.length-1 ?
    currQuoteIndex = 0
    :
    currQuoteIndex += 1;
  console.log(currQuoteIndex);
  reset();
  showQuote();
  hiLiteDot(); // This is new
}

const prevQuote = () => {
  if (currQuoteIndex === 0) {
    currQuoteIndex = quotes.length-1
  } else {
    currQuoteIndex -= 1;
  }
  console.log(currQuoteIndex);
  reset();
  showQuote();
  hiLiteDot(); // This is new
}
Click through the quotes and…oops…same problem as before with the quotes: the dots are highlighting but not returning to normal style because the ‘active’ class hasn’t been removed. So all the dots are highlighted now.
We can easily fix this by adding one more part to our “reset” function. Let’s simply loop through the NodeList for the dots and remove the ‘active’ class.
const reset = () => {
  quotes.forEach(quote => quote.classList.remove('show-quote'));
  dots.forEach(dot => dot.classList.remove('active'));
}
Now click through the quotes and notice the dots respond how they should and indicate which quote is showing. Everything seems to be working fine.
In Summary:
- we created some quotes for our webpage, each inside a
divwith the same class - we accessed those
divelements by their class usingquerySelectorAll()which created a NodeList of thedivelements making them accessible by index (so loops can work with them too!). - we created two arrow HTML elements allowing us to click to the next or previous quote
- we kept track of the quote showing on the webpage by creating a global variable of a number (which acted as the index number for the NodeLists)
- we added some CSS classes to hide and show the quotes
- we created a footer element with dots to indicate which quote was showing
- we accessed those dots using
querySelectorAll()which created a NodeList of thespanelements that made those dots. - we made event handler functions for the arrows to increment or decrement the global variable of a number (which acted as the index number for the NodeLists)
- we made a function to show a quote by adding a class
- we made a function to style a dot by adding a class
- we made a function called “reset” to loop through the quotes and dots to remove all classes that showed or styled them in a special way.
- we set up
addEventListenermethods for the arrows to call event handler functions composed of other functions to help show and hide the quotes.
Your Turn
Exercise 1: Make an image rotator (a la the quote rotator) with 7 different images. Add two buttons or icons to move forward and back through the images. Add some kind of indicator showing which image in the group is showing.
Exercise 2: Make a navbar with 5 different links in it. The navbar links must be styled with a uniform style with the only difference being their text content. When any of the links is clicked, its style/appearance changes to show that it is selected. All the other links’ style must remain normal.
Exercise 3: Make a form. In our form we have multiple input elements of type text, number, email, checkboxes, radio buttons, and a couple of select elements. Use querySelector to highlight different parts of the form based on various selectors.
Exercise 4: Make a line of 10 circles all with a white background and a black border. Make a button with the text content “Start”. When the button is clicked, the left-most circle (which is the 1st element in the HTMLCollection) has its background color change to “coral” and stay that way for 1 second then changes back to white again. The 2nd circle to the right of the 1st circle then has its background color change to “coral” for 1 second then turns back to white. Move through all ten circle this way so it appears as a “moving” sequence of circles turning from white to coral then back to white.
The goal is to use querySelectorAll, getElementsByClassName or getElementsByTagName and the NodeList or HTMLCollection, that they create, to meet the goals of these exercises.
You can compare your work for this lesson with mine here at CodePen or watch the video.
Don’t worry, we will still learn how to click on the quote rotator’s dots in order to go to a new quote. We’ll learn that in the next lesson when we talk about the ‘event’ object and its ‘target’ property.