JavaScript Webpage Workout - M2 Lesson 4 (Event object and Target property)
January 05, 2021
This module follows Module 2 Lesson 3. Please do that lesson first before this one. If this is your first time to the course, check out the Introduction.
📺 This M2 Lesson 4 is also available as a video.
Let’s start this lesson by ACCESSing the footer element which is the parent element of the span tags representing the ‘dots.’
const footer = document.querySelector('footer');
console.log(footer)
Next, go to where the other event listeners are located in your code and add an event listener to the variable footer. For the event handler function, type in an anonymous arrow function that console logs “Footer has been clicked” then click the footer and check the console to make sure it works.
footer.addEventListener('click', () => {
  console.log("Footer has been clicked")
});
Next, add the argument event to that anonymous arrow function and console log the event. You must click on the footer to see the console log since the ‘click’ event is what triggers it.
footer.addEventListener('click', (event) => {
  console.log(event)
});
You should open the console in your browser to see what the event object looks like. Here’s an example:
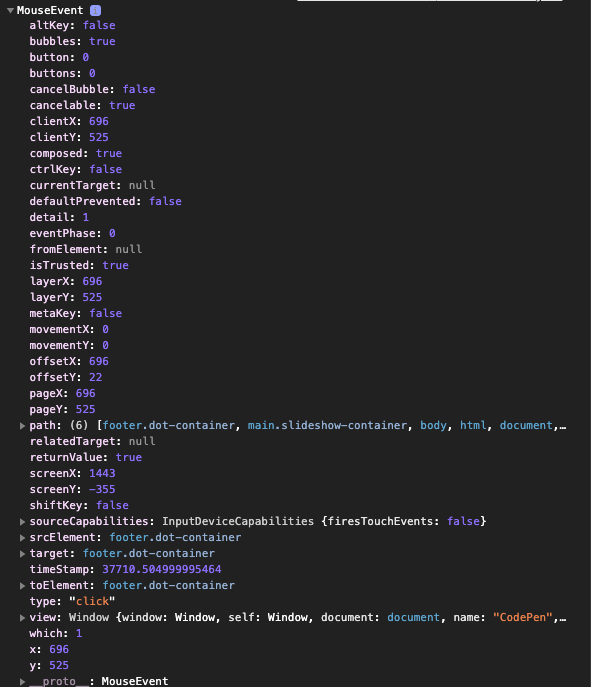
Notice that the first thing you see is “MouseEvent” with a carat next to it. We clicked the footer which is a mouse event, so labelling it as a “MouseEvent” makes sense.
Click on the carat to look inside the event object. You will see a long list of properties starting with altKey’ and ending with _proto. All of these properties describe that mouse event we performed; they let us know what “features” in terms of properties or functions that are avialable to us, the programmer.
One property we want to immediately tap into is the target property. The target is the element we performed the event on (i.e. clicked on). Go to that target property and click on the carat next to it.
Again, you will see numerous properties associated with the footer HTML element on our webpage such as dataset, id, classList, className, style. Style property? Sound familiar?

We spent quite a few lessons using the style property as well as classList, and we know that HTML elements can use class and id attributes. Well, there they are located in the deep dark well of the event object’s target property.
Next, let’s change our anonymous arrow function to console log event.target. Again, make sure to click on the footer then check the console.
footer.addEventListener('click', (event) => {
  console.log(event.target)
});

// You should see this in the console:
"<footer class='dot-container'>
    <span class='dot active'></span>
    <span class='dot'></span>
    <span class='dot'></span>
  </footer>"
So that console log tells us the target of that click event is the footer and we see all its HTML as well as the HTML of its children, the span elements.
Now click on the first dot in the footer, that is, the span element representing the dot.
// You should see:
"<span class='dot active'></span>"
To test this out even further, try to console log event.target.className
footer.addEventListener('click', (event) => {
  console.log(event.target.className)
});

// You should see:
"dot-container"
That matches what we saw in our console for the footer. It does indeed have a class of “dot-container.”
What if we were to add an ID to this HTML span element. Add the id=“0” to the first span element.
...
  <footer class="dot-container">
    <span class="dot active" id="0"></span>
    <span class="dot"></span>
    <span class="dot"></span>
  </footer>
</main>
Now change the anonymous arrow function to console log event.target.id BUT make sure to click on the first dot. Check the console.
footer.addEventListener('click', (event) => {
  console.log(event.target.id)
});

// You should see
"0"
Now, add IDs to the 2nd and 3rd dots: id="1" and id="2".
...
  <footer class="dot-container">
    <span class="dot active" id="0"></span>
    <span class="dot" id="1"></span>
    <span class="dot" id="2"></span>
  </footer>
</main>
Click on the 2nd dot. Check the console.
Click on the 3rd dot. Check the console.
footer.addEventListener('click', (event) => {
  console.log(event.target.id)
});

// You should see
"1"  then "2"
What is happening here? We put our addEventListener on the footer! Why can we click the span dots and see the IDs for those span tags?
The answer is because of a concept called “bubbling” where a child element’s event can bubble up to the parent and the parent will “hear” it or “register” it. So the console is showing us what events are bubbling up to the parent element which is the footer, in this example.
Just to be sure you’re understanding what’s going on, change the console log back to this:
footer.addEventListener('click', (event) => {
  console.log(event.target)
});

Now click the first dot, then the second dot, then the third dot.

The console shows each _span_ element because after clicking on each span, the event bubbles up to the parent and the parent registers "Oh, my first child element has been clicked which is a _span_ with a class of 'dot active' and an id of '0'. My second child element been been clicked...".  We then see each element and its HTML attributes in the console.

This is HUGE!  This is a gateway for us programmers.  We can use that information to help us program the webpage.

To prove this, each _span_'s ID atribute can return a "0", "1", or "2" after clicking on any of those elements.  We can then use each span's ID to match the index position of the quote we want to see.  As an example, if I click on the first _span_ "dot", the _event.target.id_ returns "0".  I can use that "0" to show the first quote, for example, `quotes[currQuoteIndex]` which is the same as `quotes[0]`.


If I click on the second _span_, the _event.target.id_ returns "1" (look at the console).  I can use that "1" to show the second quote on the webpage, for example, `quotes[currQuoteIndex]` which is the same as `quotes[1]`.

```js
footer.addEventListener('click', (event) => {
  console.log(event.target.id)
  let currQuoteIndex = event.target.id;
});
All we have to do now is use the other functions that we alrady built to follow setting the “currQuoteIndex” to event.target.id. BUT we also have to make sure event.target.id is a Number since we will use it as an index position with our “quotes” NodeList. So add event.target.id as the argument of the Number() function.
footer.addEventListener('click', (event) => {
  console.log(Number(event.target.id))
  let currQuoteIndex = Number(event.target.id);
  reset();
  showQuote();
  hiLiteDot();
});
Now click through the quotes by clicking the dots. Everything seems to be working fine…sort of. There’s one problem we’ll have to fix.
But first, let’s add a cursor: pointer property to the dot class so that we let our users know these dots are clickable.
.dot {
  height: 15px;
  width: 15px;
  margin: 0 2px;
  background-color: #333;
  border-radius: 50%;
  display: inline-block;
  transition: background-color 0.6s ease;
  cursor: pointer;
}
Ok, let’s fix the one bug we have. To find the bug click in the footer but don’t click any of the dots.
Yes, the quote rotator just gets destroyed when we click on anything other than the dots. Why?
When we click on an element, we are trying to use event.target.id which must be a number (0, 1, or 2). If you click on the footer, it doesn’t have an ID so there is no event.target.id with a number. So the quote rotator sets the variable “currQuoteIndex” to “undefined” and so none of quote elements load on the webpage. In other words, quotes[undefined] won’t load any quote. We can only access our quotes with the numbers quotes[0], quotes[1], or quotes[2] matching the indices of the three quote elements on our webpage.
Therefore, we have to refactor our last anonymous function with an IF statement. We now need to use the power of the target property we learned about before. There is a property in the target property called “nodeName,” see the image below.
After we click on a dot, the event.target has a “nodeName” property with a value of capitalized “SPAN”.

Let’s adjust our anonymous function so it only runs our code if the element we click on has a “nodeName” of “SPAN,” otherwise just return out of the function.
footer.addEventListener('click', (event) => {
  console.log(event.target.nodeName)
  if (event.target.nodeName === "SPAN") {
    currQuoteIndex = event.target.id
    reset();
    showQuote();
    hiLiteDot();
  } else {
    return;
  }
});
Looks good. It works…until, we click one of the arrow icons.
Because our arrow icons are also SPAN elements this will still be a bug. The user clicks the arrow and the quotes just disappear. That’s not our intention! Worry not! We can still use other properties on the target property such as classList. We can adjust our IF statement to say if the event.target.classList.contains(“dot”) then carry out the rest of the code.
footer.addEventListener('click', (event) => {
  console.log(event.target.nodeName)
  if (event.target.classList.contains("dot")) {
    currQuoteIndex = event.target.id
    reset();
    showQuote();
    hiLiteDot();
  } else {
    return;
  }
});
This will work now because only the dots have a class of dot. Problems solved! Pay raise and promotion!
In Summary:
- we ACCESSed the dots by accessing the their parent container footer
- we then looked at the “event” object that is available to us via the callback function for addEventListener.
- we used the target property of the “event” object to get access to attributes of whatever we clicked on in the footer, for example the dots
- we use the HTML span elements ID attribute as a tool to set each dot with a number ID (kind of a number! a number in a string “0”)
- we used event.target.id and the Number() function to get each span’s number ID
- we used that number ID of the span as the index number of the quote to view within the quotes NodeList
- We found bugs! We solved them with other useful properties of the target property such as nodeName, classList, contains.
Your Turn
Exercise 1: Take the image rotator that you made in Lesson 3 (the previous lesson). Now add a footer row of thumbnail images which will act as a clickable menu of the larger images in the image gallery. So if you click on thumbnail “image 1” then that same bigger image should populate the larger space of the rotator/gallery. It’s a little like the quote rotator and using the small dots as clickable markers to see certain quotes.
Exercise 2: You’ll be making Tab Headers. Make a header with a large area (i.e. full screen width) to display a product or featureor service. At the bottom of the header is a separate section or footer of four tabs (buttons) each with distinct labels. Each of the tabs, when clicked, will show different information in the large header area. For example, the first tab could be labelled “Home”; the second tab is “Features”; the third tab could be “Pricing Plans”; the fourth tab could be “Contact” or “About Us”. You can make these tabs be anything you want: maybe product features of four different guitars or artist albums. The goal is to make the header display the relavant information based on the tab button that is clicked. One example, could be click on a tab labelled “Tokyo” and the header populates with an image of Tokyo and aparagraph of informatin. Click on the tab labelled “Paris” and the header image now changes to Paris and the paragraph information also changes.
exercise 3: Closable List Items - Make an unordered list with 7 list items. Each list item must also have a span element with an icon (X) that when clicked removes that list item. Rather than adding an event listener to each list item, use the event object to help you identify the list items. (See an example here: https://www.w3schools.com/howto/howto_js_close_list_items.asp but don’t look at or copy the JavaScript code).
The goal is to now be flexible with the methods you’ve learned. At times, you’ll use querySelector or querySelectorAll. You may need to use loops or you may need to implement the Event object or focus on textContent. Don’t forget that you can put event listeners on parent elements to detect events happening on their child elements (i.e. also called event bubbling). The important thing to remember is you now have lots of tools to make webpage functionality and flexibility happen. Many times, start by getting one part of the project to show, that means ironing out the HTML and CSS. Then you can integrate some logic to figure out how to get the HTML elements on the page to change (i.e. manipulate).
You can compare your work for this lesson with mine here at CodePen or watch the video.
Don’t worry, we will still learn how to click on the quote rotator’s dots in order to go to a new quote. We’ll learn that in the next lesson when we talk about the ‘event’ object and its ‘target’ property.